
A lot of Great Stuff goes out over the broadcast radio bands, but it's rare that you're actually in a position to hear it. I have solved this problem with various systems to record radio broadcasts to cassette tapes. My starting equipment was a boom box and a hardware-store AC power timer switch, later updated to a fancy stereo tuner and a slightly nicer timer switch. Some stereo tuners have an 'instant on' feature which remembers what radio station they were set to when they were turned off, thus allowing you to hook a tape drive to them and turn them on through the power cord. All of these approaches suffer from several drawbacks. Hardware-store timers work only in 24-hour cycles, so if you want to tape a show at 8pm Saturday and another at noon Sunday, you must reset them between days. More expensive timers feature interfaces which are very difficult to learn and manipulate, limiting their usefulness. It is also difficult to keep these timers precise; they're really not built for that purpose. In addition, you can only turn the radio on or off with them. You must also be sure to get the thing tuned to the right channel. Every step you do to catch a radio broadcast increases the chance that you will make a mistake and miss the show.
The obvious solution to this problem is to use a computer to control both radio and tape deck, setting times and channel tunings through it. The ideal way to have this work would be to have a single device with a radio, a computer, and a tape deck all tied together inside, along with a clean, simple interface to control them all. In the real world, there's probably not enough crazed radio listeners to justify designing and manufacturing such a thing. But it's still possible to hook all these things together. With Linux, an old PC, and a PC radio card, you can build a device to hang off your home network which will be simple to operate and let you listen to some Really Cool Stuff for less than $150.
The system I built started with a '486 DX 66 PC with a 1.5 GB hard disk and 16 MB of RAM, which I obtained in exchange for a 6-pack of good homebrew beer. I could have done only a half-gig of drive space. To this I added a PC Cadet radio card (about $40), a CM17A 'Firecracker' X10 control module (I got mine free in a promotion), the tape deck (bought used from a friend), an X10 radio transceiver module ($20 or so), and some audio cables. The tape deck must have a 'record on' feature, so that you can force it to begin recording immediately when you supply it power. The audio cable has a miniature stereo plug on one side, and a pair of RCA plugs on the other. Most audio stores sell these for plugging portable CD players into room stereo systems.
The first step in building the radio timer is to attach all the hardware you'll need to the PC. Plug the PC Cadet radio card into an available ISA slot. Plug the CM17A "Firecracker" module into one of the serial ports on the back of the PC. The CM17A needs a DB9 connection; if you have only the larger DB25 serial port on your machine, you'll need an adapter. The CM17A features a pass-through DB9 port on the outside of the device. Reports are that this works well if you need to plug another device into your box's DB9 port.
It's best to run your radio listener server "Headless" (with no monitor or keyboard) on a network. This way, you can work with it from somewhere else in your house, and you won't have to power a monitor which you'll seldom have reason to read. The only thing actually travelling over the network will be text, so you can use a 10BaseT card to connect the server to your network. Try to find a PC with a BIOS up to date enough to include the option not to test the keyboard on boot if you go this route. Even though you won't be using it, your radio server will need a video card in order to boot properly. Access to a parts pile comes in handy here, since even an old 'Hercules' black & white video card will serve well for this.
I first installed the Debian 'Potato' release of Linux on my PC (of course, I had a monitor and keyboard attached for this task). The installation was straightforward, and the release CDs had all the drivers I needed. Installing Linux is outside the scope of this essay; if you need help, The Linux Installation HOWTO is as good a place as any to start. You need not install X-Windows or any of its support files, since you'll be talking to the machine over your network rather than running an X server on it. This cuts down the pain of installation by a good bit. It is best to avoid dual-boot or floppy-boot configurations if at all possible for a server like this, since with no monitor it is difficult to tell what is happening if the machine will not come up far enough to talk to the network. I chose to put C and Perl on this server, although they are not strictly necessary for what I am doing on it now. They will help if I later decide to experiment with browser-based configuration or want to use the server as a general-purpose X10 server machine.
Another useful trick on a server like this, controlled from your network and inside your firewall, is to make /sbin/shutdown runnable from an unprivileged account. On a multi-user system, you should not do this for security reasons. But if you are the only user of your Linux box, changing /sbin/shutdown this way makes it possible to shut down from any of the accounts on which you happen to be logged in. The way to do this is with the chmod(1) command. Log in as root, then type
chmod +s /sbin/shutdownThis also allows you to use one user cron file to control the machine, which simplifies setting it up and making it work.
The first step in putting together the radio listener server is to get the computer to control a broadcast radio receiver. I used the PC Cadet radio card for my receiver, although several other radio cards also work with Linux. Linux 2.2 controls the 'Cadet' radio card, as well as several other types of cards, through the Video4Linux drivers. Setting the card up is a 4-step process. First, you must use the pnpdump(8) utility to create an isapnp parameter file and edit this file appropriately. See the Plug-and-Play-HOWTO for detailed instructions on configuring isapnp devices. I was able to work this step out from the man(1) pages on isapnp(8) and pnpdump(8) without too much difficulty. The PC Cadet radio card will give back the ID string "ADS Cadet AM/FM Radio Data Receiver V. 1.4". The pnpdump(8) program will also show what the base IO address of the card is; chances are this is 0x200. After you have successfully modified the output file from pnpdump(8) and fed it to isapnp(8), you can load the "videodev" driver into memory with insmod(8). Then, load the "radio-cadet" module with an argument of "io=number", where number is the Cadet's base IO address as given by pnpdump(8). You must next configure the "/dev/radio0" device at 81,64 with mknod(1). Finally, install the fm program to talk to the radio card through your new device. You now have a broadcast radio receiver controlled by your computer. The PC Cadet radio card has only a single "line out" jack, so you will need a portable boom box with a "line in" and your audio cable to verify that everything is working correctly. Plug the boom box's "line in" into the radio card's "line out", switch the box to "Line" mode, and you should be able to make broadcast radio come out of it from your command line. After you've satisfactorily performed the device configuration steps, you can make sure they happen at every boot by placing the modified output file from pnpdump(8) in /etc/isapnp.conf and the appropriate modules and arguments in /etc/modules.conf.
At this point, you have a computer which can play broadcast radio on the channel you want. The next step is to make it able to control the tape deck, so you can capture the output of the radio receiver. That is the job of the CM17A 'Firecracker' X10 module. Making the CM17A work is simpler than setting up the radio card. Make sure that you have the drivers for the serial ports loaded correctly (this should have been taken care of when you installed your system). You can then install the "br" program (available in the the Debian package repository, although you will have to hunt for it under "stable/electronics/bottlerocket"). and use it to determine which serial port you have the CM17A plugged into. The simplest way to test it out is to plug a lamp into your X10 transceiver module, then try to control it from the command line with the "br" program. Once you know which serial port you are working with (there are most probably only two you need worry about),create a softlink to the correct device with ln(1) called "/dev/firecracker".
You address X10 devices with both a 'house code' and a device sequence number. I am already using X10 to control some lights in my house, so I used a housecode different from the one on my light controllers on the X10 transceiver connected to my cassette deck. This also makes for easier administration if you decide to control other X10 devices from your Linux box. The X10 controller used for lamps is unreliable when connected to a radio or other electronic device; it is best to use an "appliance module", which contains a relay rather than a solid-state switch, for these kinds of devices. Fortunately, the X10 transceiver has a relay of this kind, so if you're only using X10 for this one thing, you're OK here.
The best way to set the other server software up is to centralize everything to do with timed radio reception under one user ID. I have a "Radio" user which holds the script, crontab(1) files, and other application files I need to run the radio. If you're setting this up on a box you use for other things, this is a necessary step. Otherwise, your head will explode from complexity when it's time to back up or modify your machine.
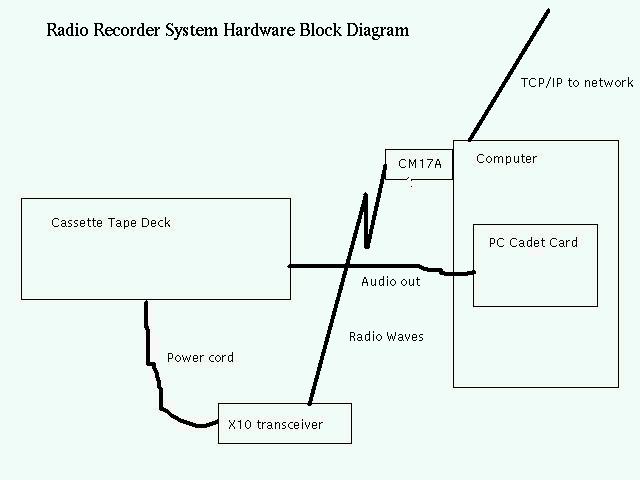
After you have proven that the CM17A and the radio card work separately, try assembling and testing the whole system. The PC will get power from the wall. Plug your tape deck into the X10 transceiver and thence into the wall, and run the audio cable from the PC to the tape deck. Connect the PC to your network. Make sure that the tape deck is set to record when it's powered up, and you should be ready to go.
When you are finished, the hardware should be connected together like this.
 You should now be able to turn the tape deck on in record mode
from a telnet session on your server, then
turn the radio on in the same way and watch the LEDs on your deck move as broadcast
radio sounds flow onto your cassette tape. Take the tape over to your stereo and
play it to verify
you are really getting what you should. You'll probably have to twiddle some
knobs on your cassette deck to get the levels just right. I also installed a fancy
powered antenna on the PC radio card to improve FM reception; you may not need to
do this if the radio stations you're interested in are strong enough in your area. I
favor 120 minute cassettes for this kind of listening, since
few radio shows last more than an hour.
You may find that audio quality is better with shorter tapes.
You should now be able to turn the tape deck on in record mode
from a telnet session on your server, then
turn the radio on in the same way and watch the LEDs on your deck move as broadcast
radio sounds flow onto your cassette tape. Take the tape over to your stereo and
play it to verify
you are really getting what you should. You'll probably have to twiddle some
knobs on your cassette deck to get the levels just right. I also installed a fancy
powered antenna on the PC radio card to improve FM reception; you may not need to
do this if the radio stations you're interested in are strong enough in your area. I
favor 120 minute cassettes for this kind of listening, since
few radio shows last more than an hour.
You may find that audio quality is better with shorter tapes.
After you've gotten your pieces to work together, you'll need some way to automagically kick off the radio on the appropriate times and channels. Linux comes with a marvelous system program called cron(8), which provides timed execution of scripts. All you need to do is set up a set of crontab(1) entries for your radio user which will set the radio channel and turn it and the tape deck on and off when your favorite shows come around. You could go nuts here, with a really cool web-based interface,a perl script to do the controlling and another CGI script to edit your crontab file, and all kinds of slick amazing bells & whistles. To just make it work, I used bash(1). The script I came up with is short, simple, and to the point:
Text version of this listing
#!/bin/bash
#################################################################################
# Very first shell script to control radio. Very crude.
#
# Charles Shapiro Dec 2000
################################################################################
LOGFILE=/home/radio/radio.log
BREXEC=/usr/bin/br
FMEXEC=/usr/local/bin/fm

echo ------------------ >> ${LOGFILE}
date >> ${LOGFILE}
${BREXEC} -c b -n 1 >> ${LOGFILE} 2>1
${FMEXEC} $1 65536 >> ${LOGFILE} 2>1
echo Sleeping $2m.. >> ${LOGFILE}
sleep $2m >> ${LOGFILE} 2>1
${FMEXEC} off >> ${LOGFILE} 2>1
${BREXEC} -c b -f 1 >> ${LOGFILE} 2>1
date >> ${LOGFILE}
echo ------------------ >> ${LOGFILE}
The logfile is a necessary refinement; many subtle errors can creep in when you are setting up cron jobs, and it is a great debugging help. For example, I found it necessary to explicitly specify the path to each executable I used in this script, lest the programs not get found when it ran under cron(8). This results in an hour of empty tape if the "fm" program doesn't run, or the radio playing into a dead tape recorder if the "br" program fails.
Use crontab(1) to set the cron file you'll use to tune your radio. Mine currently looks like this:
#
# Crontab file for radio
#
# Charles Shapiro Dec 2000
#
# Prairie Home Companion
00 19 * * Sat /home/radio/radiofirst.sh 90.1 70
# Industrial Noise
00 00 * * Sun /home/radio/radiofirst.sh 91.1 70
# My Word
00 12 * * Sun /home/radio/radiofirst.sh 90.1 70
# Locals Only
00 19 * * Sun /home/radio/radiofirst.sh 99.7 70
#Shutdown after weekend
00 21 * * Sun /sbin/shutdown -h -y now
# Commonwealth of California
00 10 * * Wed /home/radio/radiofirst.sh 88.5 70
# Between the Lines
30 19 * * Thur /home/radio/radiofirst.sh 90.1 40
#Shutdown after mid-week
00 21 * * Thur /sbin/shutdown -h -y now
Your crontab(8) will vary, since this is the place where you record your taping choices. The 'shutdown' lines in this crontab file bring Linux down gracefully from my 'radio' account, so I can turn the machine off from the power strip when it will be idle for a few days. Without them, I would have to fire up another machine and log in to manually shut the system down. Setting the /sbin/shutdown program's privileges to allow a non-privileged account to run it allows me to keep everything in the radio account's crontab(8) file, so it's easier for me to understand what will happen when. Of course, if you're not so stingy as I am, or if you want to listen to more different things, you may choose to leave your radio server on all the time. My choice here means that I must remember to turn the server on again on the days when I will be taping.
A real 31337 7190X HAX04 D00D would do all this on a 'diskless' PC, running everything from a couple of floppy drives with LRP (the Linux Router Project) or another one of the tiny Linux distributions. I've already made that approach work on this project, so I may eventually tear the drive and SCSI controller out of my radio listener server and use them on another machine.
Given that we already have the hard drive there though, one good refinement would be to improve the user interface. I could run apache on the box and create a CGI script connected to a browser form to make it easy to change what radio stations it will listen to and when. Another possible direction is to create MP3 files instead of tapes, but this would depend on a sound card in the PC and an MP3 player in my car, neither of which are on the horizon (the current radio PC is out of slots). I've also thought about daisy-chaining tape decks to the Cadet's 'audio out' cable and connecting them to different X10 appliance controllers. This would make it possible to go longer without swapping tapes, so I could tape more than one show without being physically present. The video4linux spec also allows more than one radio card to reside in the same machine, so you could modify this setup to tape more than one show at the same time. Another great thing would be to attach a CM11A X10 controller to the radio PC's remaining comm port and power strip. These devices have independently programmed timers, so that the PC could tell the CM11A to wake it up in a couple of days and then shut the power off to itself. This would mean I would not have to remember to hit the power strip switch every couple of days. A less elegant solution would be to use one of my old hardware-store timers which I have lying around the house for the same purpose.
This kind of application is one place where Linux can truly shine. Cheap, single-purpose servers which do one thing extremely well are a good extension of the original Unix and Linux software philosophy of simple parts glued together for complex behavior. This project would not have been possible with an expensive, GUI-based operating system such as OS/2, Windows, or BeOS. Doing it with MS-DOS would have involved an extensive development effort on the application side, even assuming you could find or write drivers for the radio card and CM17A.